Drawing a fractal with a compute shader
This section isn't going to introduce any new concept, but will show a real world example by using a compute shader to write a Mandelbrot set to an image.
Just like in the introduction to compute
pipelines, we need to write some GLSL code and
create a compute pipeline. This is done with the vulkano_shader::shader! macro, as explained in
that section. Each invocation of the main function of the shader will write one pixel.
Note: You can find the full source code of this section here.
The shader
Let's spend some time on the GLSL code of the shader, which I wrote for you:
#version 460

layout(local_size_x = 8, local_size_y = 8, local_size_z = 1) in;

layout(set = 0, binding = 0, rgba8) uniform writeonly image2D img;

void main() {
    vec2 norm_coordinates = (gl_GlobalInvocationID.xy + vec2(0.5)) / vec2(imageSize(img));
    vec2 c = (norm_coordinates - vec2(0.5)) * 2.0 - vec2(1.0, 0.0);

    vec2 z = vec2(0.0, 0.0);
    float i;
    for (i = 0.0; i < 1.0; i += 0.005) {
        z = vec2(
            z.x * z.x - z.y * z.y + c.x,
            z.y * z.x + z.x * z.y + c.y
        );

        if (length(z) > 4.0) {
            break;
        }
    }

    vec4 to_write = vec4(vec3(i), 1.0);
    imageStore(img, ivec2(gl_GlobalInvocationID.xy), to_write);
}
Let's go through this line by line:
layout(local_size_x = 8, local_size_y = 8, local_size_z = 1) in;
For better parallelization, we decided that each invocation of the shader would write a value to a
pixel of the image. As you can see, this time we use a local size of 8x8, which is two-dimensional.
We will use the value of gl_GlobalInvocationID to decide which pixel we will write.
layout(set = 0, binding = 0, rgba8) uniform writeonly image2D img;
This line declares the presence of an image that we are going to use, at the slot 0 of the descriptor set 0. As you can see we have to specify its format. Trying to use an image whose format doesn't match what is expected will result in an error.
vec2 norm_coordinates = (gl_GlobalInvocationID.xy + vec2(0.5)) / vec2(imageSize(img));
vec2 c = (norm_coordinates - vec2(0.5)) * 2.0 - vec2(1.0, 0.0);
These lines declare two variables whose type is vec2. A vec2 is equivalent to a [f32; 2]
and is usually used to store 2D coordinates. Similarly ivec4 is for example equivalent to
[i32; 4], uvec3 is equivalent to [u32; 3], and so on. The Mandelbrot set is a set of complex
numbers, so in this shader we use several vec2s to store the real and imaginary parts of the
complex numbers that we manipulate.
The purpose of these two lines is to put in the variable c the complex number that corresponds
to the pixel of the image that we modify. The pixel that we are going to write will have a color
that depends on whether or not its corresponding complex number is within the set or not.
vec2 z = vec2(0.0, 0.0);
float i;
for (i = 0.0; i < 1.0; i += 0.005) {
    z = vec2(
        z.x * z.x - z.y * z.y + c.x,
        z.y * z.x + z.x * z.y + c.y
    );

    if (length(z) > 4.0) {
        break;
    }
}
We now want to find out whether the complex number that we are manipulating (i.e. c) is within
the Mandelbrot set. The definition of the Mandelbrot set says that a number c is within the set
if the function f(z) = z² + c diverges when iterated from z = 0 (z being a complex number).
This is exactly what we do in this code. We start from z = vec2(0.0, 0.0) and iterate with a
for loop. Each iteration puts the value of the next iteration in z and checks whether it is
diverging (we consider that it is diverging if length(z) > 4.0).
Note: The
lengthfunction is a built-in function in GLSL. You can find its definition and the definitions of all the built-in functions at docs.gl.
What we have left at the end of the for loop is the i variable. If c is in the set then the
function didn't diverge, the for loop went to the end, and i will contain 1.0. Otherwise c
is not within the set and i will contain a number between 0.0 and 1.0. The closer c is to
the set, the higher i will be. Therefore the value of i is what we are going to store in our
image.
vec4 to_write = vec4(vec3(i), 1.0);
imageStore(img, ivec2(gl_GlobalInvocationID.xy), to_write);
In these two lines, vec4(..), vec3(..) and ivec2(..) are conversion functions. They convert
their parameters into respectively a vec4, a vec3 and a ivec2.
vec3(i) is a shortcut for vec3(i, i, i).
Writing the pixel of an image must be done with the imageStore function. As explained in a
previous section the content of the image is opaque and is always treated as
floating-points, even though we know that its memory contains integers.
Calling this shader
Now that the shader is written, the rest should be straight-forward. We start by creating an image, as seen before:
#![allow(unused)]
fn main() {
let image = Image::new(
    memory_allocator.clone(),
    ImageCreateInfo {
        image_type: ImageType::Dim2d,
        format: Format::R8G8B8A8_UNORM,
        extent: [1024, 1024, 1],
        usage: ImageUsage::STORAGE | ImageUsage::TRANSFER_SRC,
        ..Default::default()
    },
    AllocationCreateInfo {
        memory_type_filter: MemoryTypeFilter::PREFER_DEVICE,
        ..Default::default()
    },
)
.unwrap();
}
This time we can't just clear the image like we did earlier. To actually pass the image
to the GPU shader, we first need to create a ImageView of it. An ImageView describes where
and how the GPU should access or use the image. Here, we want a view of the entire image,
so the creation isn't very difficult:
#![allow(unused)]
fn main() {
use vulkano::image::view::ImageView;

let view = ImageView::new_default(image.clone()).unwrap();
}
Now, let's create the descriptor set by adding the image view, like we did earlier:
#![allow(unused)]
fn main() {
let layout = compute_pipeline.layout().set_layouts().get(0).unwrap();
let set = PersistentDescriptorSet::new(
    &descriptor_set_allocator,
    layout.clone(),
    [WriteDescriptorSet::image_view(0, view.clone())], // 0 is the binding
    [],
)
.unwrap();
}
Next, we can create a buffer for storing the image output:
#![allow(unused)]
fn main() {
let buf = Buffer::from_iter(
    memory_allocator.clone(),
    BufferCreateInfo {
        usage: BufferUsage::TRANSFER_DST,
        ..Default::default()
    },
    AllocationCreateInfo {
        memory_type_filter: MemoryTypeFilter::PREFER_HOST
            | MemoryTypeFilter::HOST_RANDOM_ACCESS,
        ..Default::default()
    },
    (0..1024 * 1024 * 4).map(|_| 0u8),
)
.expect("failed to create buffer");
}
The command buffer contains a dispatch command followed with a copy-image-to-buffer command:
#![allow(unused)]
fn main() {
let mut builder = AutoCommandBufferBuilder::primary(
    &command_buffer_allocator,
    queue.queue_family_index(),
    CommandBufferUsage::OneTimeSubmit,
)
.unwrap();
builder
    .bind_pipeline_compute(compute_pipeline.clone())
    .unwrap()
    .bind_descriptor_sets(
        PipelineBindPoint::Compute,
        compute_pipeline.layout().clone(),
        0,
        set,
    )
    .unwrap()
    .dispatch([1024 / 8, 1024 / 8, 1])
    .unwrap()
    .copy_image_to_buffer(CopyImageToBufferInfo::image_buffer(
        image.clone(),
        buf.clone(),
    ))
    .unwrap();

let command_buffer = builder.build().unwrap();
}
And finally just like in the previous section we execute the command buffer and export the image as a PNG file:
#![allow(unused)]
fn main() {
let future = sync::now(device.clone())
    .then_execute(queue.clone(), command_buffer)
    .unwrap()
    .then_signal_fence_and_flush()
    .unwrap();

future.wait(None).unwrap();

let buffer_content = buf.read().unwrap();
let image = ImageBuffer::<Rgba<u8>, _>::from_raw(1024, 1024, &buffer_content[..]).unwrap();
image.save("image.png").unwrap();

println!("Everything succeeded!");
}
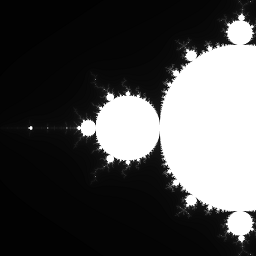
And here is what you should get: